Configurazione di FTD Multi-Instance High-availability su Firepower 4100
Opzioni per il download
Linguaggio senza pregiudizi
La documentazione per questo prodotto è stata redatta cercando di utilizzare un linguaggio senza pregiudizi. Ai fini di questa documentazione, per linguaggio senza di pregiudizi si intende un linguaggio che non implica discriminazioni basate su età, disabilità, genere, identità razziale, identità etnica, orientamento sessuale, status socioeconomico e intersezionalità. Le eventuali eccezioni possono dipendere dal linguaggio codificato nelle interfacce utente del software del prodotto, dal linguaggio utilizzato nella documentazione RFP o dal linguaggio utilizzato in prodotti di terze parti a cui si fa riferimento. Scopri di più sul modo in cui Cisco utilizza il linguaggio inclusivo.
Informazioni su questa traduzione
Cisco ha tradotto questo documento utilizzando una combinazione di tecnologie automatiche e umane per offrire ai nostri utenti in tutto il mondo contenuti di supporto nella propria lingua. Si noti che anche la migliore traduzione automatica non sarà mai accurata come quella fornita da un traduttore professionista. Cisco Systems, Inc. non si assume alcuna responsabilità per l’accuratezza di queste traduzioni e consiglia di consultare sempre il documento originale in inglese (disponibile al link fornito).
Sommario
Introduzione
In questo documento viene descritto come configurare il failover nelle istanze del contenitore FTD (a più istanze).
Prerequisiti
Requisiti
Cisco raccomanda la conoscenza di Firepower Management Center e Firewall Threat Defense.
Componenti usati
Cisco Firepower Management Center Virtual 7.2.5
Appliance Cisco Firepower 4145 NGFW (FTD) 7.2.5
Firepower eXtensible Operating System (FXOS) 2.12 (0.498)
Windows 10
Le informazioni discusse in questo documento fanno riferimento a dispositivi usati in uno specifico ambiente di emulazione. Su tutti i dispositivi menzionati nel documento la configurazione è stata ripristinata ai valori predefiniti. Se la rete è operativa, valutare attentamente eventuali conseguenze derivanti dall'uso dei comandi.
Prima di distribuire FTD Multi-Instance, è importante capire come può influire sulle prestazioni del sistema e pianificare di conseguenza. Per garantire un'installazione e una configurazione ottimali, consultare sempre la documentazione ufficiale Cisco o un rappresentante tecnico Cisco.
Premesse
Multi-Instance è una funzione di Firepower Threat Defense (FTD) simile alla modalità a contesto multiplo ASA. Consente di eseguire più istanze di FTD di contenitori separati su un singolo componente hardware. Ogni istanza contenitore consente la separazione delle risorse hardware, la gestione di configurazione separata, ricaricamenti separati, aggiornamenti software separati e il supporto completo delle funzionalità di difesa dalle minacce. Ciò è particolarmente utile per le organizzazioni che richiedono criteri di sicurezza diversi per reparti o progetti diversi, ma che non desiderano investire in più appliance hardware separate. La funzione Multi-Instance è attualmente supportata sulle appliance di sicurezza Firepower serie 4100 e 9300 con FTD 6.4 e versioni successive.
In questo documento viene utilizzato Firepower4145, che supporta al massimo 14 istanze di contenitore. Per il numero massimo di istanze supportate in Firepower Appliance, vedere Numero massimo di istanze del contenitore e di risorse per modello.
Esempio di rete
Questo documento introduce la configurazione e la verifica di HA in istanze multiple in questo diagramma.
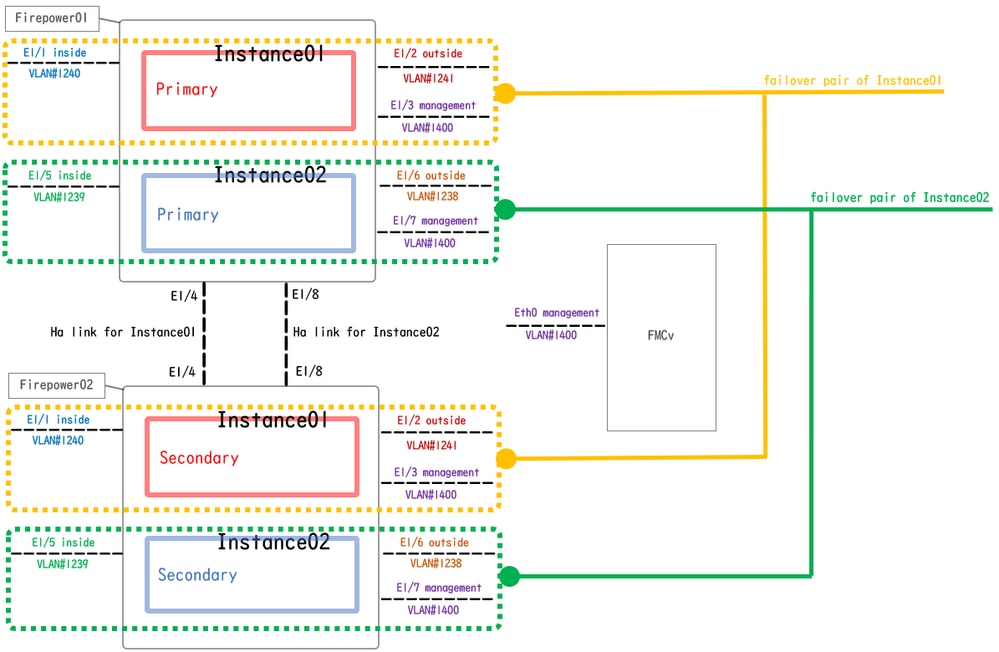 Diagramma di configurazione logica
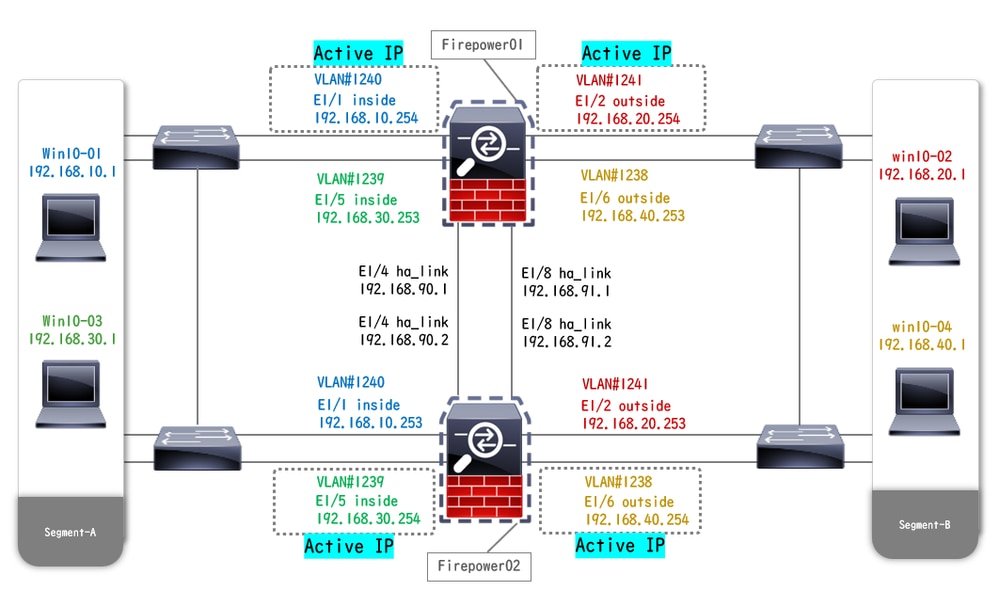 Diagramma configurazione fisica
Configurazioni
Passaggio 1. Interfacce pre-configurate
a. Passare a Interfacce su FCM. Impostare 2 interfacce di gestione. Nell'esempio, Ethernet1/3 e Ethernet1/7.
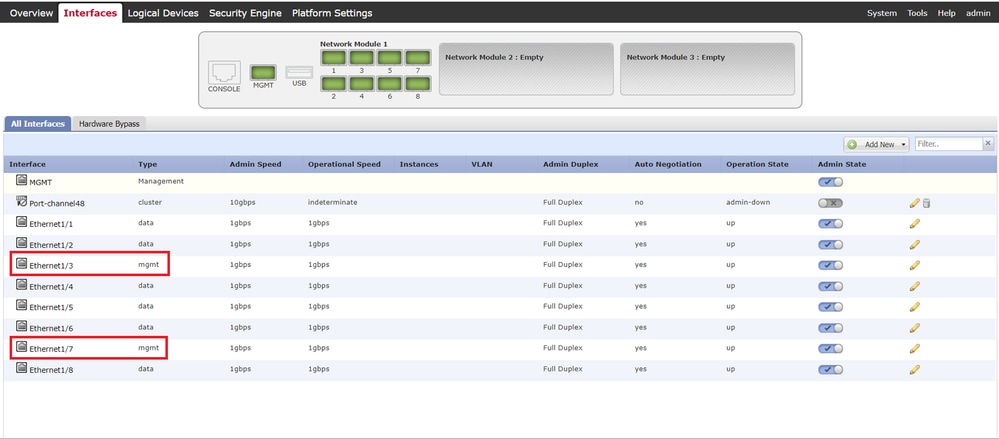 Interfacce pre-configurate
Passaggio 2. Aggiungere 2 profili di risorse per le istanze del contenitore.
a. Passare a Impostazioni piattaforma > Profili risorse > Aggiungi a FCM. Impostare il primo profilo risorsa.
Nell'esempio:
·Nome: Instance01
·Numero di core: 10

Nota: per la disponibilità elevata della coppia di istanze del contenitore, è necessario che utilizzino gli stessi attributi del profilo della risorsa.
Impostare il nome del profilo tra 1 e 64 caratteri. Si noti che non è possibile modificare il nome di questo profilo dopo averlo aggiunto.
Impostare il numero di core per il profilo, tra 6 e il massimo.
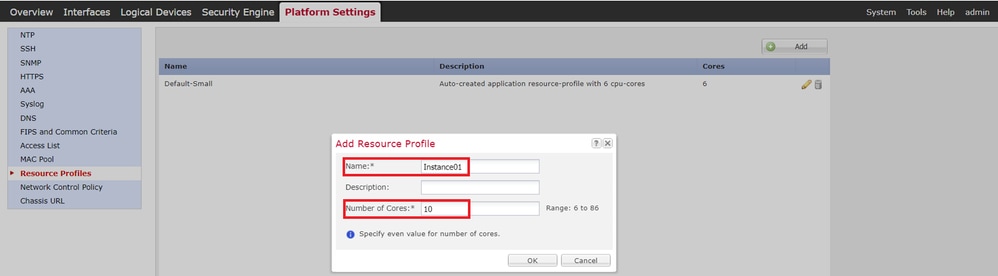 Aggiungi primo profilo di risorsa
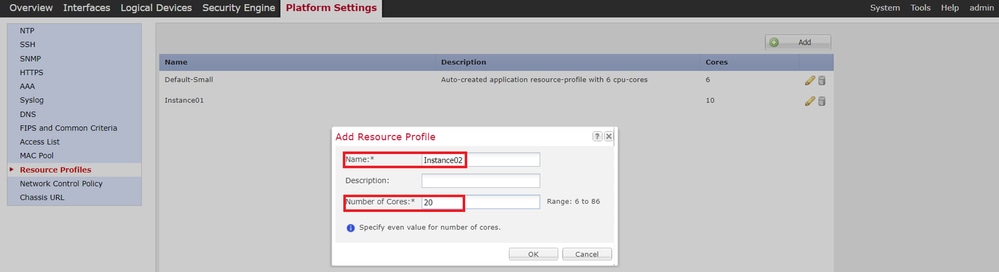
b. Ripetere a. nel passo 2, per configurare il secondo profilo di risorsa.
Nell'esempio:
·Nome: Instance02
·Numero di core: 20
 Aggiungi secondo profilo risorse
c. Verificare che 2 profili di risorse siano stati aggiunti correttamente.
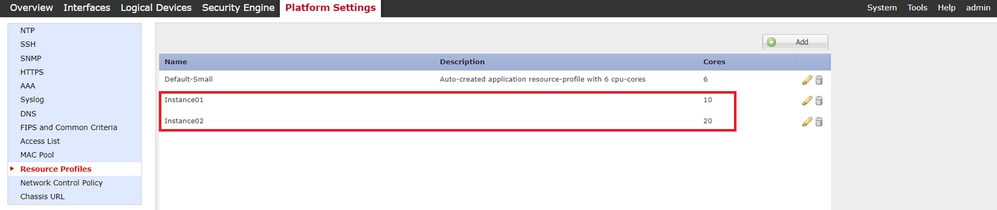 Conferma profilo risorsa
Passaggio 3. (Facoltativo)Aggiungere un prefisso del pool MAC dell'indirizzo MAC virtuale per le interfacce dell'istanza del contenitore.
È possibile impostare manualmente l'indirizzo MAC virtuale per l'interfaccia attiva/standby. Se gli indirizzi MAC virtuali non sono impostati per la funzionalità multi-istanza, lo chassis genera automaticamente indirizzi MAC per le interfacce di istanza e garantisce che un'interfaccia condivisa in ciascuna istanza utilizzi un indirizzo MAC univoco.
Per ulteriori dettagli sull'indirizzo MAC, selezionare Aggiungi prefisso pool MAC e Visualizza indirizzi MAC per interfacce istanze contenitore.
Passaggio 4. Aggiungere un'istanza autonoma.
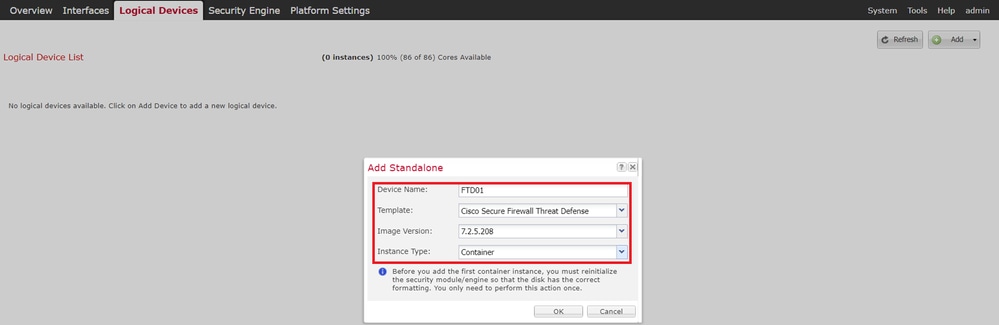
a. Selezionare Logical Devices > Add Standalone. Impostare la prima istanza.
Nell'esempio:
·Nome dispositivo: FTD01
·Tipo di istanza: contenitore
Nota: l'unico modo per distribuire un'applicazione contenitore consiste nella predistribuzione di un'istanza dell'applicazione con il tipo di istanza impostato su Container. Assicurarsi di selezionare Container.
Non è possibile modificare questo nome dopo aver aggiunto la periferica logica.
 Aggiungi istanza
Passaggio 5. Configurazione interfacce
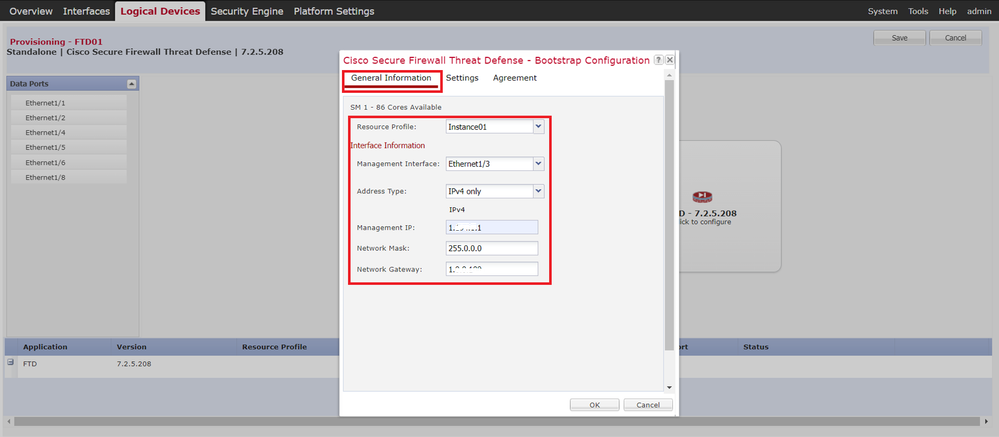
a. Impostare Resource Profile, Management Interface (Interfaccia di gestione), Management IP (IP di gestione) per Instance01.
Nell'esempio:
·Profilo risorsa: istanza01
·Interfaccia di gestione: Ethernet1/3
·ManagementIP: x.x.1.1
 Configurazione profilo/interfaccia di gestione/IP di gestione
b. Interfacce dati set.
Nell'esempio:
·Ethernet1/1 (per l'interno)
·Ethernet1/2 (per uso esterno)
·Ethernet1/4 (utilizzato per il collegamento HA)
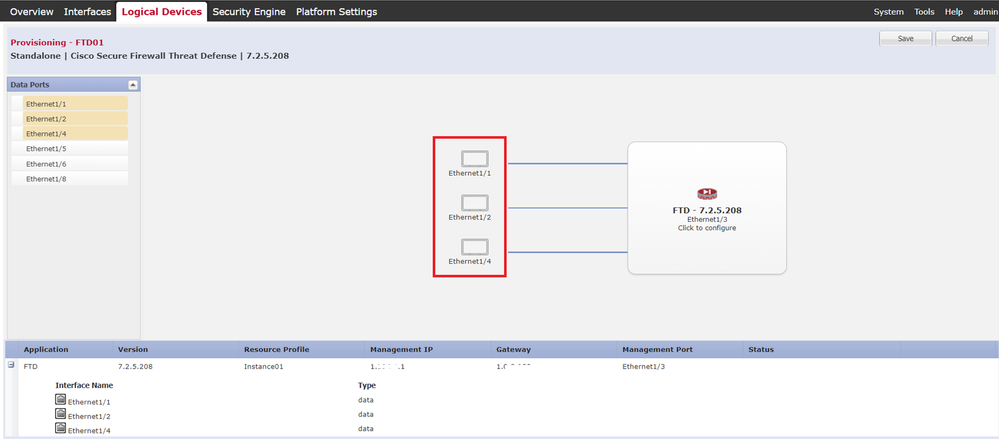 Imposta interfacce dati
c. Passare a Dispositivi logici. In attesa dell'avvio dell'istanza.
 Conferma stato dell'istanza 01
d. Ripetere a. nel passo 4.a e dal passo 5.a al passo 5.c per aggiungere la seconda istanza e impostare i dettagli per essa.
Nell'esempio:
·Nome dispositivo : FTD11
·Tipo di istanza : Contenitore
·Profilo risorse: Istanza02
·Interfaccia di gestione : Ethernet1/7
·ManagementIP : x.x.10.1
·Ethernet1/5 = interno
·Ethernet1/6 = esterno
·Ethernet1/8 = collegamento HA
e. Confermare che 2 istanze siano in linea su FCM.
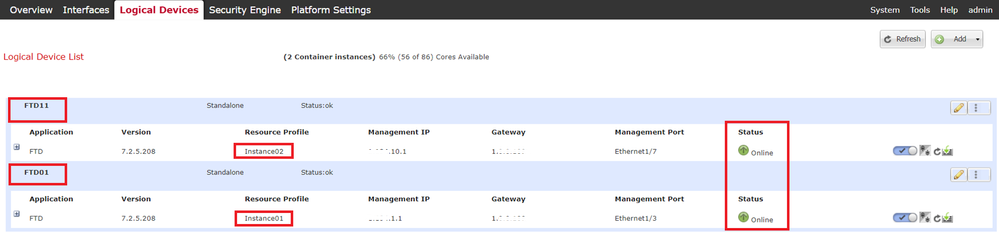 Conferma Stato Istanza Nel Dispositivo Principale
f. (Facoltativo)Esegui scope ssa scope slot 1 e show app-Instance comando per confermare che 2 istanze sono in linea sulla CLI di Firepower.
FPR4145-ASA-K9# scope ssa FPR4145-ASA-K9 /ssa # scope slot 1 FPR4145-ASA-K9 /ssa/slot # show app-Instance Application Instance: App Name Identifier Admin State Oper State Running Version Startup Version Deploy Type Turbo Mode Profile Name Cluster State Cluster Role ---------- ---------- ----------- ---------------- --------------- --------------- ----------- ---------- ------------ --------------- ------------ ftd FTD01 Enabled Online 7.2.5 208 7.2.5 208 Container No Instance01 Not Applicable None --> FTD01 Instance is Online ftd FTD11 Enabled Online 7.2.5 208 7.2.5 208 Container No Instance02 Not Applicable None --> FTD11 Instance is Onlineg. Eseguire la stessa operazione sul dispositivo secondario. Confermare che 2 istanze sono in linea.
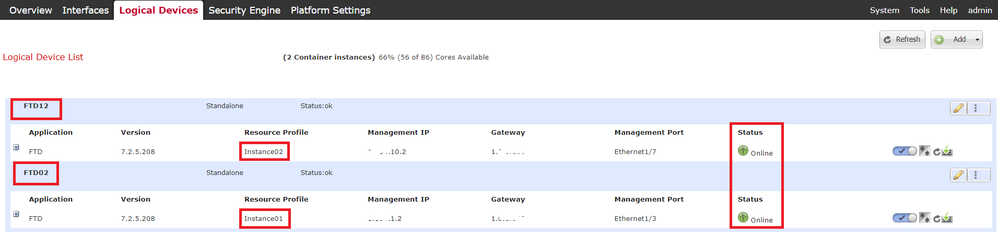 Conferma stato istanza nel dispositivo secondario
Passaggio 6. Aggiungere Una Coppia Di Disponibilità Elevata Per Ogni Istanza.
Passaggio 6. Aggiungere Una Coppia Di Disponibilità Elevata Per Ogni Istanza.a. Selezionare Dispositivi > Aggiungi dispositivo su FMC. Aggiungere tutte le istanze a FMC.
Nell'esempio:
·Nome visualizzato per Instance01 di FTD1: FTD1_FTD01
·Nome visualizzato per Instance02 of FTD1: FTD1_FTD11
·Nome visualizzato per Instance01 di FTD2: FTD2_FTD02
·Nome visualizzato per Instance02 of FTD2 : FTD2_FTD12
Nell'immagine è illustrata l'impostazione per FTD1_FTD01.
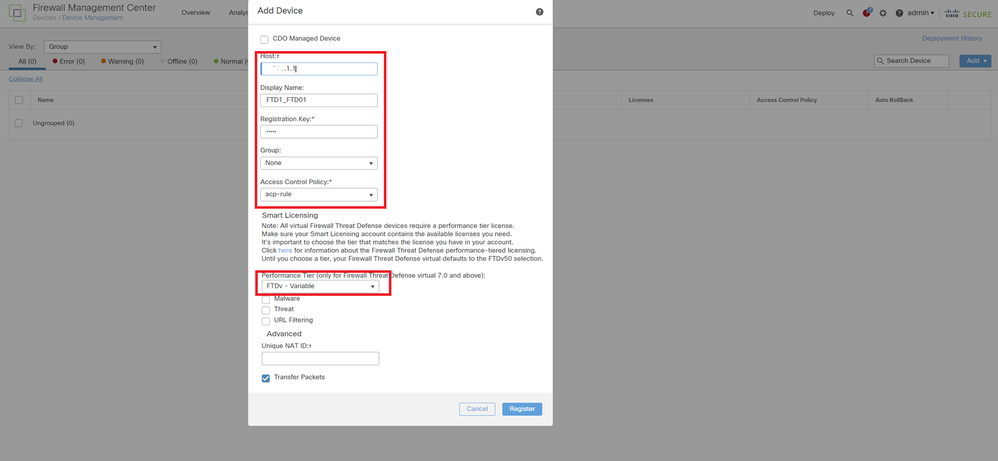 Aggiungi istanza FTD a FMC
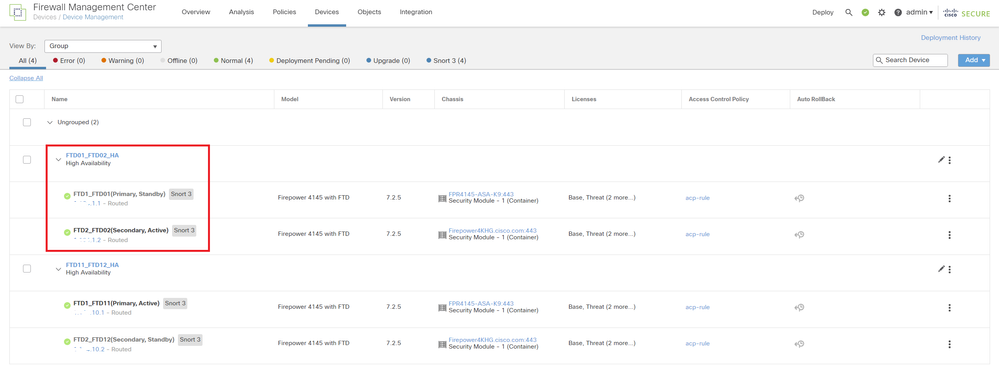
b. Confermare che tutte le istanze siano normali.
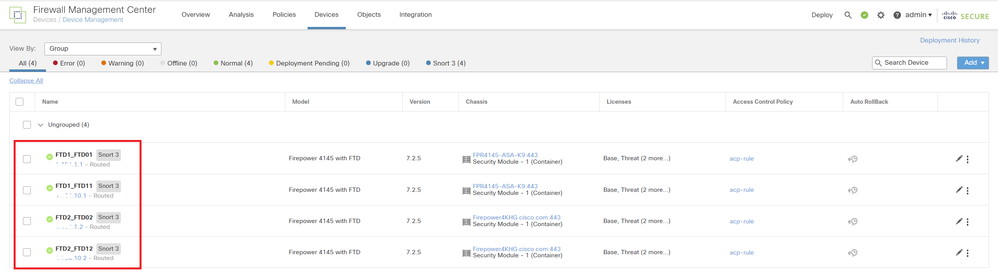 Conferma stato istanza in FMC
c. Passare a Dispositivi > Aggiungi alta disponibilità. Impostare la prima coppia di failover.
Nell'esempio:
·Nome: FTD01_FTD02_HA
·Peer primario : FTD1_FTD01
·Peer secondario: FTD2_FTD02
Nota: assicurarsi di selezionare l'unità corretta come unità principale.
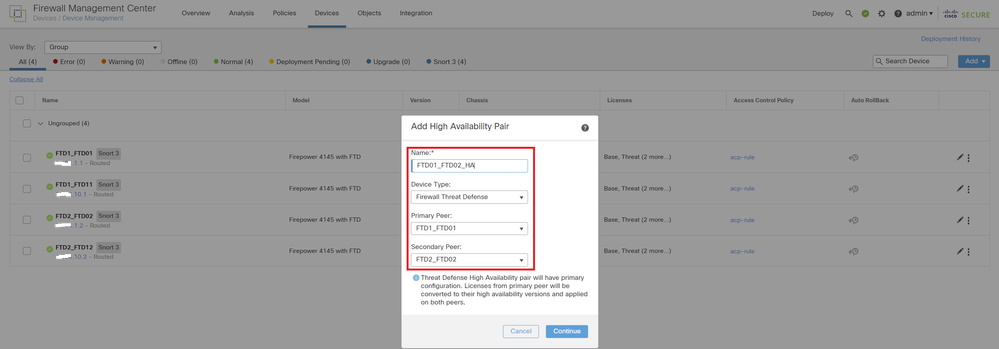 Aggiungi prima coppia di failover
d. Impostare IP per il collegamento di failover nella prima coppia di failover.
Nell'esempio:
·Collegamento ad alta disponibilità: Ethernet1/4
·Collegamento stato: Ethernet1/4
·IP primario: 192.168.90.1/24
·IP secondario: 192.168.90.2/24
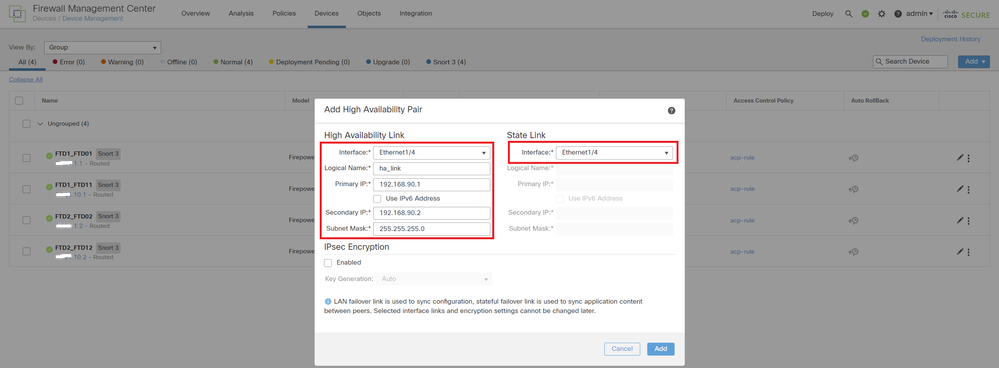 Impostare l'interfaccia HA e l'indirizzo IP per la prima coppia di failover
e. Confermare lo stato del failover
·FTD1_FTD01: primario, attivo
·FTD2_FTD02: secondario, standby
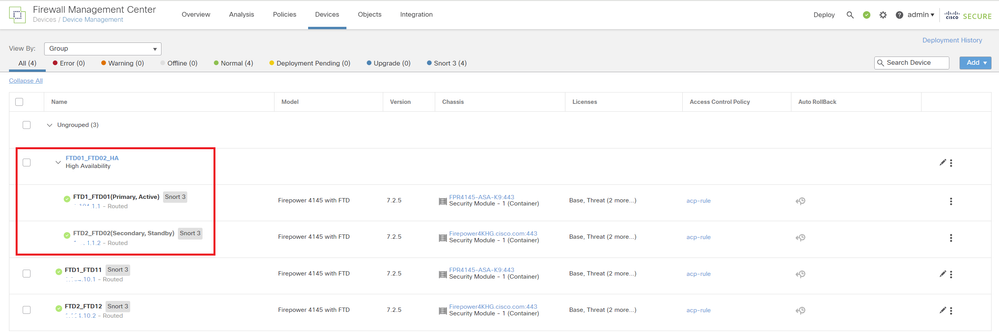 Confermare Lo Stato Della Prima Coppia Di Failover
f. Selezionare Devices > Click FTD01_FTD02_HA (in questo esempio) > Interfaces. Imposta IP attivo per interfaccia dati.
Nell'esempio:
·Ethernet1/1 (interna) : 192.168.10.254/24
·Ethernet1/2 (esterno) : 192.168.20.254/24
·Ethernet1/3 (diagnostica) : 192.168.80.1/24
L'immagine mostra l'impostazione per l'IP attivo di Ethernet1/1.
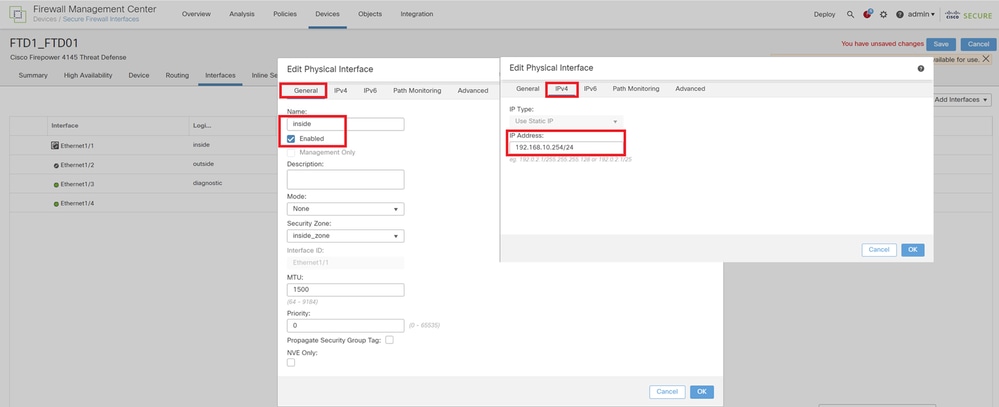 Imposta IP attivo per interfaccia dati
g. Passare a Dispositivi > Fare clic su FTD01_FTD02_HA (in questo esempio) > Alta disponibilità. Impostare Standby IP per Data Interface.
Nell'esempio:
·Ethernet1/1 (interna) : 192.168.10.253/24
·Ethernet1/2 (esterno) : 192.168.20.253/24
·Ethernet1/3 (diagnostica) : 192.168.80.2/24
Questa immagine mostra l'impostazione per Standby IP di Ethernet1/1.
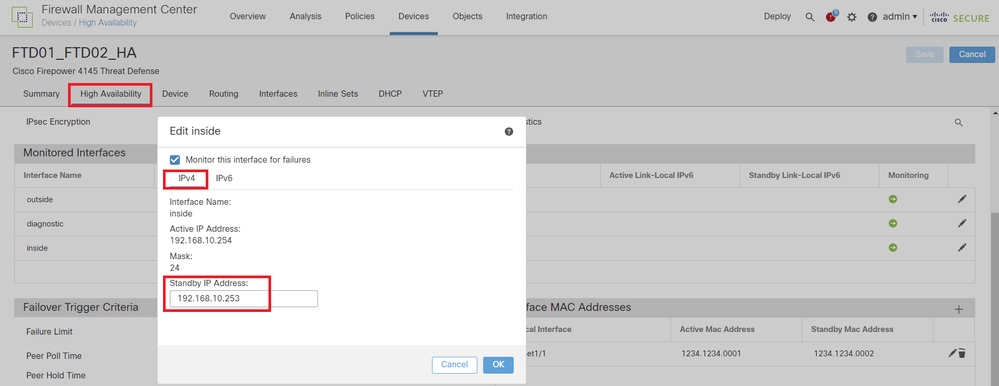 Imposta IP standby per interfaccia dati
h. Ripetere i passi da 6.c a g per aggiungere la seconda coppia di failover.
Nell'esempio:
·Nome : FTD11_FTD12_HA
·Primary Peer : FTD1_FTD11
·Peer secondario: FTD2_FTD12
·Collegamento ad alta disponibilità : Ethernet1/8
·State Link : Ethernet 1/8
·Ethernet1/8 (ha_link attivo) : 192.168.91.1/24
·Ethernet1/5 (interno attivo) : 192.168.30.254/24
·Ethernet1/6 (esterno attivo) : 192.168.40.254/24
·Ethernet1/7 (diagnostica attiva) : 192.168.81.1/24
·Ethernet1/8 (ha_link Standby) : 192.168.91.2/24
·Ethernet1/5 (in standby) : 192.168.30.253/24
·Ethernet1/6 (fuori dallo standby) : 192.168.40.253/24
·Ethernet1/7 (diagnostic Standby) : 192.168.81.2/24
i. Passare a Dispositivi logici > Aggiungi standalone. Impostare la regola del provider di servizi di audioconferenza per consentire il traffico dall'interno all'esterno.
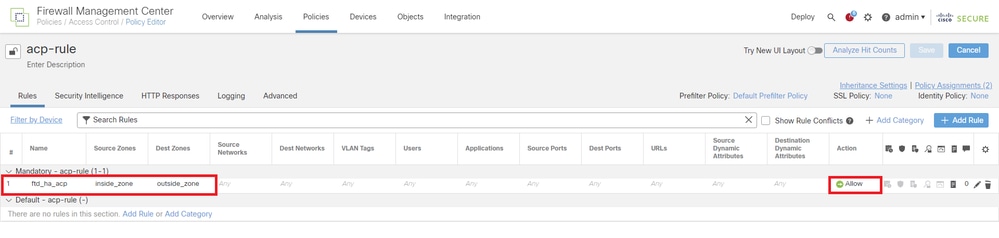 Imposta regola ACP
j. Distribuire l'impostazione su FTD.
k. Conferma stato HA nella CLI
Lo stato HA di ciascuna istanza è confermato anche nella CLI di Firepower, che è uguale allo stato di ASA.
Eseguire show running-config failover e show failover il comando per confermare lo stato HA di FTD1_FTD01 (istanza primaria01).
// confrim HA status of FTD1_FTD01 (Instance01 of Primary Device) > show running-config failover failover failover lan unit primary failover lan interface ha_link Ethernet1/4 failover replication http failover link ha_link Ethernet1/4 failover interface ip ha_link 192.168.90.1 255.255.255.0 standby 192.168.90.2 > show failover Failover On Failover unit Primary Failover LAN Interface: ha_link Ethernet1/4 (up) ...... This host: Primary - Active <---- Instance01 of FPR01 is Active Interface diagnostic (192.168.80.1): Normal (Monitored) Interface inside (192.168.10.254): Normal (Monitored) Interface outside (192.168.20.254): Normal (Monitored)
...... Other host: Secondary - Standby Ready <---- Instance01 of FPR02 is Standby Interface diagnostic (192.168.80.2): Normal (Monitored) Interface inside (192.168.10.253): Normal (Monitored) Interface outside (192.168.20.253): Normal (Monitored)
Eseguire show running-config failover e show failover il comando per confermare lo stato HA di FTD1_FTD11 (istanza primaria02).
// confrim HA status of FTD1_FTD11 (Instance02 of Primary Device) > show running-config failover failover failover lan unit primary failover lan interface ha_link Ethernet1/8 failover replication http failover link ha_link Ethernet1/8 failover interface ip ha_link 192.168.91.1 255.255.255.0 standby 192.168.91.2 > show failover Failover On Failover unit Primary Failover LAN Interface: ha_link Ethernet1/8 (up) ...... This host: Primary - Active <---- Instance02 of FPR01 is Active Interface diagnostic (192.168.81.1): Normal (Monitored) Interface inside (192.168.30.254): Normal (Monitored) Interface outside (192.168.40.254): Normal (Monitored) ......
Other host: Secondary - Standby Ready <---- Instance02 of FPR02 is Standby Interface diagnostic (192.168.81.2): Normal (Monitored) Interface inside (192.168.30.253): Normal (Monitored) Interface outside (192.168.40.253): Normal (Monitored)
Eseguire show running-config failover e show failover il comando per confermare lo stato HA di FTD2_FTD02 (istanza secondaria01).
// confrim HA status of FTD2_FTD02 (Instance01 of Secondary Device) > show running-config failover failover failover lan unit secondary failover lan interface ha_link Ethernet1/4 failover replication http failover link ha_link Ethernet1/4 failover interface ip ha_link 192.168.90.1 255.255.255.0 standby 192.168.90.2 > show failover Failover On Failover unit Secondary Failover LAN Interface: ha_link Ethernet1/4 (up) ...... This host: Secondary - Standby Ready <---- Instance01 of FPR02 is Standby Interface diagnostic (192.168.80.2): Normal (Monitored) Interface inside (192.168.10.253): Normal (Monitored) Interface outside (192.168.20.253): Normal (Monitored) ......
Other host: Primary - Active <---- Instance01 of FPR01 is Active Active time: 31651 (sec) slot 0: UCSB-B200-M3-U hw/sw rev (0.0/9.18(3)53) status (Up Sys) Interface diagnostic (192.168.80.1): Normal (Monitored) Interface inside (192.168.10.254): Normal (Monitored) Interface outside (192.168.20.254): Normal (Monitored)
Eseguire show running-config failover e show failover il comando per confermare lo stato HA di FTD2_FTD12 (Istanza secondaria02).
// confrim HA status of FTD2_FTD12 (Instance02 of Secondary Device) > show running-config failover failover failover lan unit secondary failover lan interface ha_link Ethernet1/8 failover replication http failover link ha_link Ethernet1/8 failover interface ip ha_link 192.168.91.1 255.255.255.0 standby 192.168.91.2 > show failover Failover On Failover unit Secondary Failover LAN Interface: ha_link Ethernet1/8 (up) ...... This host: Secondary - Standby Ready <---- Instance02 of FPR02 is Standby Interface diagnostic (192.168.81.2): Normal (Monitored) Interface inside (192.168.30.253): Normal (Monitored) Interface outside (192.168.40.253): Normal (Monitored) ......
Other host: Primary - Active <---- Instance02 of FPR01 is Active Active time: 31275 (sec) slot 0: UCSB-B200-M3-U hw/sw rev (0.0/9.18(3)53) status (Up Sys) Interface diagnostic (192.168.81.1): Normal (Monitored) Interface inside (192.168.30.254): Normal (Monitored) Interface outside (192.168.40.254): Normal (Monitored)
l. Conferma consumo licenza
Tutte le licenze vengono utilizzate per motore/chassis di sicurezza e non per istanza del contenitore.
·Le licenze di base vengono assegnate automaticamente: una per motore/chassis di sicurezza.
·Le licenze per le funzionalità vengono assegnate manualmente a ciascuna istanza, ma si utilizza solo una licenza per ogni motore/chassis di protezione delle funzionalità. Per una licenza per una funzionalità specifica, è sufficiente un totale di 1 licenza, indipendentemente dal numero di istanze in uso.
Nella tabella viene mostrato come usare le licenze in questo documento.
| PR01 |
Istanza01 |
Base, filtro URL, malware, minaccia |
| Istanza02 |
Base, filtro URL, malware, minaccia |
|
| PR02 |
Istanza01 |
Base, filtro URL, malware, minaccia |
| Istanza02 |
Base, filtro URL, malware, minaccia |
Numero totale di licenze
| Base |
Filtro URL |
Malware |
Minaccia |
| 2 |
2 |
2 |
2 |
Confermare il numero di licenze utilizzate nell'interfaccia utente grafica di FMC.
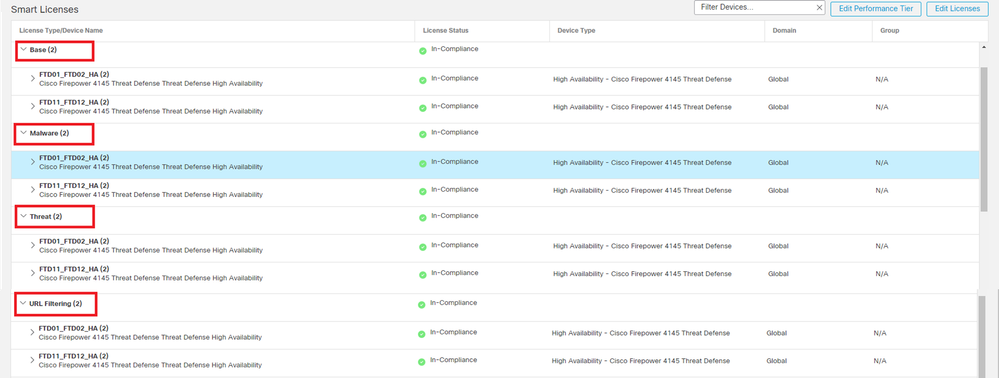 Conferma licenze usate
Verifica
VerificaQuando si verifica un crash su FTD1_FTD01 (Istanza primaria01), viene attivato il failover di Instance01 e le interfacce dati sul lato Standby rilevano l'indirizzo IP/MAC dell'interfaccia attiva originale, garantendo che il traffico (connessione FTP in questo documento) venga continuamente passato da Firepower.
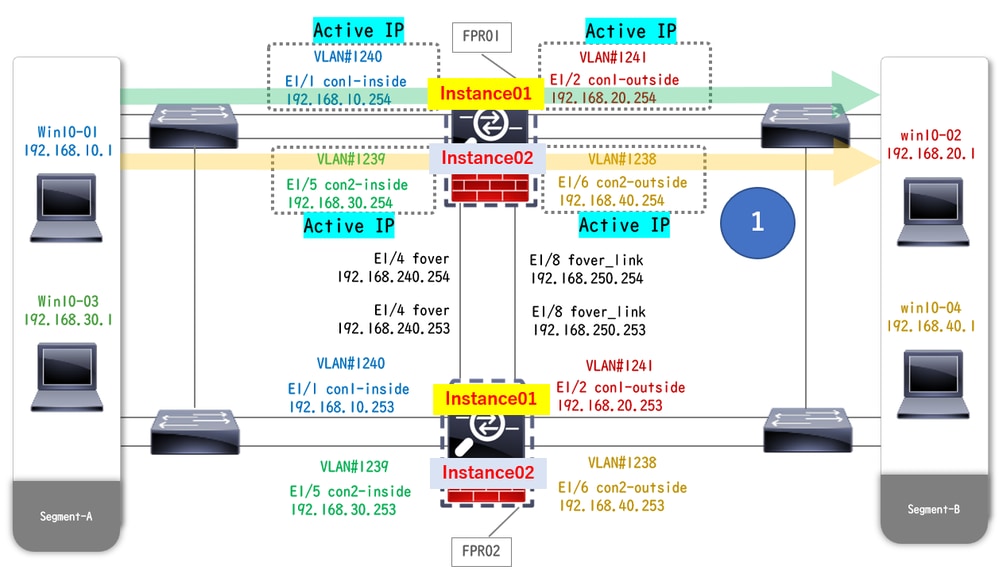 Prima dell'arresto
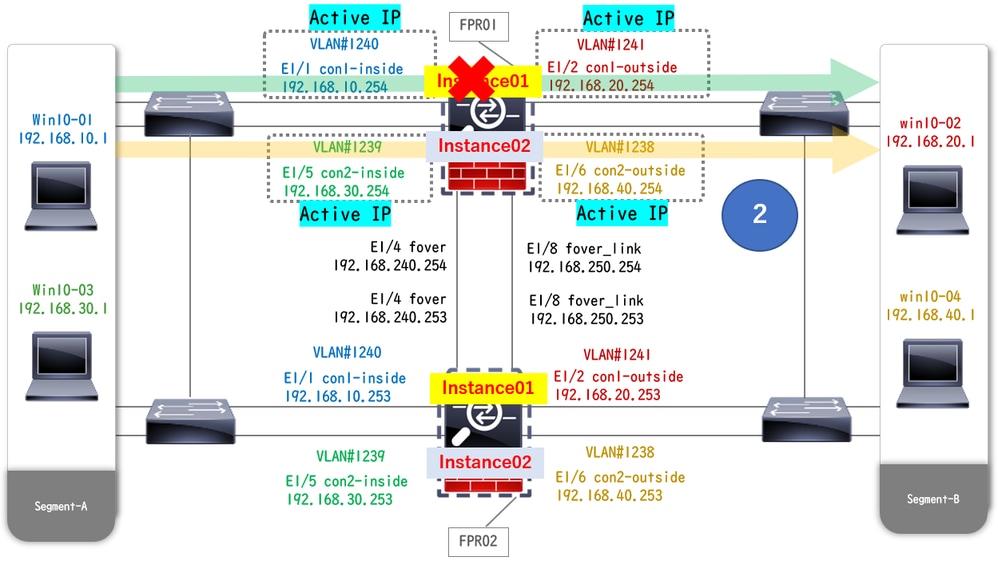 Durante l'arresto anomalo
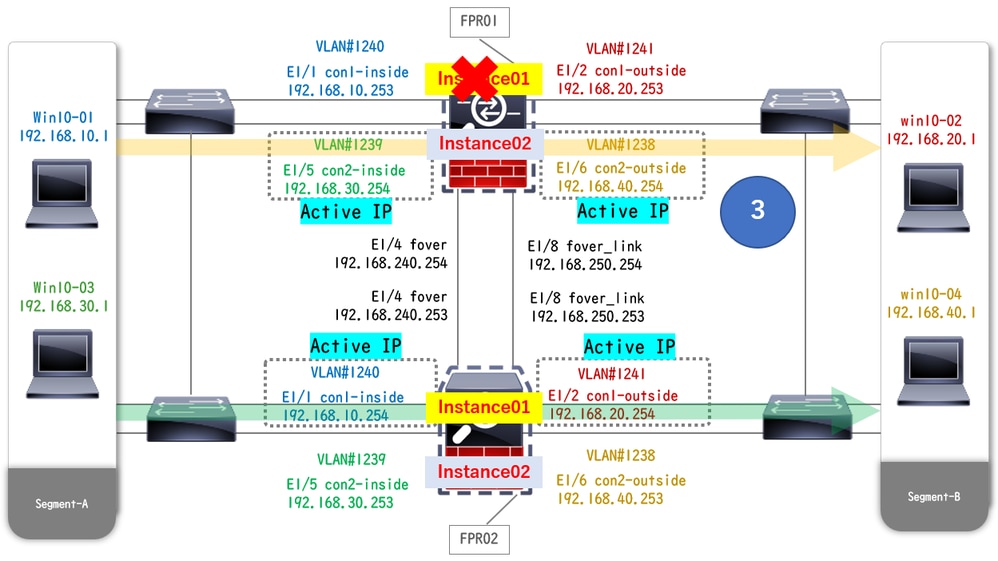 Failover Attivato
Passaggio 1. Avviare la connessione FTP da Win10-01 a Win10-02.
Passaggio 2. Il show conn comando Esegui per confermare la connessione FTP viene stabilita in entrambe le istanze di Instance01.
// Confirm the connection in Instance01 of FPR01 > show conn TCP outside 192.168.20.1:21 inside 192.168.10.1:49723, idle 0:00:11, bytes 529, flags UIO N1 // Confirm the connection in Instance01 of FPR02 > show conn TCP outside 192.168.20.1:21 inside 192.168.10.1:49723, idle 0:00:42, bytes 530, flags UIO N1Passaggio 3. Avviare la connessione FTP da Win10-03 a Win10-04.
Passaggio 4. Il show conn comando Esegui per confermare la connessione FTP viene stabilita in entrambe le istanze di Instance02.
// Confirm the connection in Instance02 of FPR01 > show conn TCP outside 192.168.40.1:21 inside 192.168.30.1:52144, idle 0:00:02, bytes 530, flags UIO N1 // Confirm the connection in Instance02 of FPR02 > show conn TCP outside 192.168.40.1:21 inside 192.168.30.1:52144, idle 0:00:13, bytes 530, flags UIO N1Passaggio 5. Eseguire connect ftd FTD01e system support diagnostic-cliil comando per accedere alla CLI di ASA. Eseguire enablee crashinfo force watchdog il comando per forzare l'arresto anomalo di Instance01 nell'unità primaria/attiva.
Firepower-module1>connect ftd FTD01 > system support diagnostic-cli FTD01> enable Password: FTD01# FTD01# crashinfo force watchdog reboot. Do you wish to proceed? [confirm]:Passaggio 6. Il failover si verifica in Instance01 e la connessione FTP non viene interrotta. Eseguire show failovere show conn per confermare lo stato di Instance01 in FPR02.
> show failover Failover On Failover unit Secondary Failover LAN Interface: ha_link Ethernet1/4 (up) ...... This host: Secondary - Active <---- Instance01 of FPR02 is Switching to Active Interface diagnostic (192.168.80.1): Normal (Waiting) Interface inside (192.168.10.254): Unknown (Waiting) Interface outside (192.168.20.254): Unknown (Waiting) ......
Other host: Primary - Failed Interface diagnostic (192.168.80.2): Unknown (Monitored) Interface inside (192.168.10.253): Unknown (Monitored) Interface outside (192.168.20.253): Unknown (Monitored) > show conn TCP outside 192.168.20.1:21 inside 192.168.10.1:49723, idle 0:02:25, bytes 533, flags U N1
Passaggio 7. L'arresto anomalo si è verificato in Instance01 e non ha avuto alcun effetto su Instance02. Eseguire show failovere show conn per confermare lo stato di Instance02.
> show failover Failover On Failover unit Secondary Failover LAN Interface: ha_link Ethernet1/8 (up) ...... This host: Secondary - Standby Ready Interface diagnostic (192.168.81.2): Normal (Monitored) Interface inside (192.168.30.253): Normal (Monitored) Interface outside (192.168.40.253): Normal (Monitored) ......
Other host: Primary - Active Interface diagnostic (192.168.81.1): Normal (Monitored) Interface inside (192.168.30.254): Normal (Monitored) Interface outside (192.168.40.254): Normal (Monitored) > show conn TCP outside 192.168.40.1:21 inside 192.168.30.1:52144, idle 0:01:18, bytes 533, flags UIO N1
Passaggio 8. Selezionare Dispositivi > Tutto in FMC. Confermare lo stato HA.
·FTD1_FTD01: primario, standby
·FTD2_FTD02: secondario, attivo
 Conferma stato HA
Passaggio 9. (Facoltativo)Dopo che Instance01 di FPR01 è tornata normale, è possibile modificare manualmente lo stato di HA. Questa operazione può essere eseguita dalla GUI di FMC o dalla CLI di FRP.
In FMC, selezionare Devices > All (Dispositivi > Tutti). Fare clic su Switch Active Peer per passare allo stato HA per FTD01_FTD02_HA.
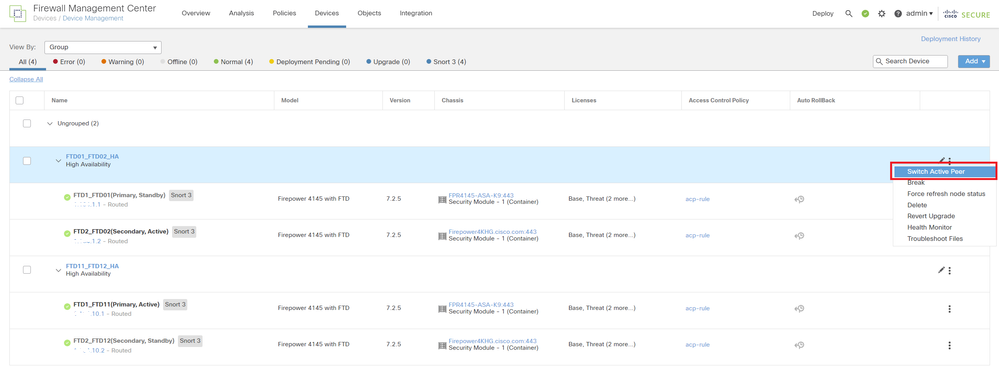 Stato switch HA
Dalla CLI di Firepower, eseguire connect ftd FTD01 il comando and system support diagnostic-cli per accedere alla CLI di ASA. Eseguire enablee failover active il comando per passare HA per FTD01_FTD02_HA.
Firepower-module1>connect ftd FTD01 > system support diagnostic-cli Attaching to Diagnostic CLI ... Press 'Ctrl+a then d' to detach. Type help or '?' for a list of available commands. firepower> enable firepower# failover active Risoluzione dei problemi
Risoluzione dei problemiPer convalidare lo stato del failover, eseguire show failover e show failover history il comando.
> show failover Failover On Failover unit Secondary Failover LAN Interface: ha_link Ethernet1/8 (up) ...... This host: Secondary - Standby Ready Interface diagnostic (192.168.81.2): Normal (Monitored) Interface inside (192.168.30.253): Normal (Monitored) Interface outside (192.168.40.253): Normal (Monitored) ......
Other host: Primary - Active Interface diagnostic (192.168.81.1): Normal (Monitored) Interface inside (192.168.30.254): Normal (Monitored) Interface outside (192.168.40.254): Normal (Monitored)

> show failover history ========================================================================== From State To State Reason ========================================================================== 07:26:52 UTC Jan 22 2024 Negotiation Cold Standby Detected an Active peer 07:26:53 UTC Jan 22 2024 Cold Standby App Sync Detected an Active peer 07:28:14 UTC Jan 22 2024 App Sync Sync Config Detected an Active peer 07:28:18 UTC Jan 22 2024 Sync Config Sync File System Detected an Active peer 07:28:18 UTC Jan 22 2024 Sync File System Bulk Sync Detected an Active peer 07:28:33 UTC Jan 22 2024 Bulk Sync Standby Ready Detected an Active peer
Eseguire il comando debug fover <option> per abilitare il registro di debug del failover.
> debug fover auth Failover Cloud authentication cable Failover LAN status cmd-exec Failover EXEC command execution conn Failover Cloud connection fail Failover internal exception fmsg Failover message ifc Network interface status trace open Failover device open rx Failover Message receive rxdmp Failover recv message dump (serial console only) rxip IP network failover packet recv snort Failover NGFW mode snort processing switch Failover Switching status sync Failover config/command replication synccount Failover Sync Count tx Failover Message xmit txdmp Failover xmit message dump (serial console only) txip IP network failover packet xmit verbose Enable verbose logging verify Failover message verifyRiferimento
Riferimentohttps://www.cisco.com/c/en/us/support/docs/security/firepower-management-center/212699-configure-ftd-high-availability-on-firep.html
https://www.cisco.com/c/en/us/td/docs/security/firepower/fxos/multi-Instance/multi-Instance_solution.html
Cronologia delle revisioni
| Revisione | Data di pubblicazione | Commenti |
|---|---|---|
1.0 |
06-Feb-2024 |
Versione iniziale |
Contributo dei tecnici Cisco
- Jian ZhangTecnico di consulenza
 Feedback